You’ll see a mixer grinder as a compact system: a motor drives blades within a sealed jar through a coupler, converting electrical energy into controlled rotational torque and speed. Understanding how blade geometry, RPM, and jar matching affect shear and impact will let you predict texture and efficiency. Learn the key components, safety interlocks, and maintenance steps that prevent wear and poor results — and how to fix common faults when performance slips.
Key Takeaways
- A mixer grinder uses an electric motor to rotate a coupler-driven blade assembly inside a sealed jar to shear and chop ingredients.
- Blades (flat, serrated, or multi-tier stainless steel) create cutting and vortex flow; higher RPMs yield finer particle size.
- The coupler links motor shaft to jar blades and includes torque-limiting features to prevent stalling or damage.
- Safety interlocks and secure lids prevent motor startup or jar ejection; always confirm seals and interlocks before use.
- Thermal protection, ventilation, and correct jar selection prevent overheating, motor overload, and mechanical failure during operation.
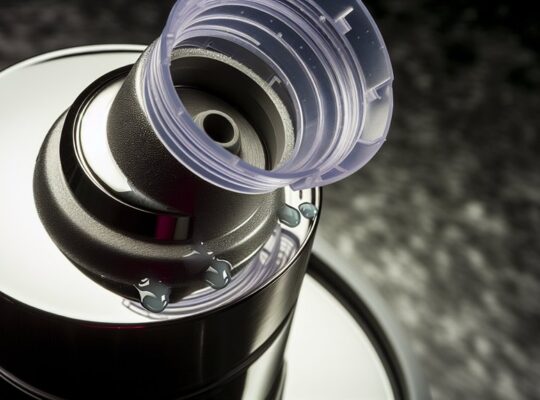
Core Components: Motor, Jar, Blades and Coupler
While the mixer grinder looks simple, its function depends on four precise components working together: the motor provides rotational power and torque, the jar contains the ingredients and defines flow dynamics, the blades perform shearing and impact cutting, and the coupler mechanically links motor shaft to blade assembly. You’ll rely on a motor specified by power rating, insulation class, and thermal protection; inspect windings, bearings, and ventilation to prevent overheating and electrical hazards. The jar’s material, wall geometry, and lid seal determine fluid circulation and pressure build-up; always secure the lid and use undamaged jars to avoid ejection or leakage. Blades are graded by hardness, edge geometry, and mounting tolerance; replace chipped or bent blades to maintain cutting efficacy and reduce stress on the coupler. The coupler must fit snugly, be free of wear, and permit safe torque transfer; a failed coupler can cause misalignment, vibration, or sudden disengagement. Follow manufacturer maintenance intervals and safety recommendations. Modern mixer grinders also include overload protection mechanisms that automatically cut power or limit motor load when current or temperature exceed safe limits, preventing damage and extending appliance life by isolating the motor during unsafe conditions and allowing controlled resets after cooling overload protection.
How Rotational Speed and Torque Affect Results
How fast and how hard a mixer grinder turns determines the cutting mechanism, heat generation, and final particle size. You’ll control rotational speed (RPM) and torque to match ingredient hardness and desired texture. Higher RPM raises shear, reduces particle size, and increases heat; low torque at high RPM stalls on dense loads. Higher torque sustains cutting under load, preventing stalling and uneven grind, but may increase mechanical stress and noise. You should monitor temperature, avoid prolonged high-speed runs, and allow cooling intervals to protect motor and ingredients. The motor’s thermal cut-off helps prevent overheating and protects the appliance during heavy use.
| Parameter | Effect on Output | Safety/Operation |
|---|---|---|
| High RPM | Fine particles, more heat | Short bursts, monitor temp |
| Low RPM | Coarse output, less heat | Good for soft mixes |
| High Torque | Stable under load | Prevents stalling |
| Low Torque | Stalls on heavy loads | Reduce load, avoid jams |
Adjust speed and torque per task, follow manufacturer limits, and prioritize motor cooling and secure lids.
Blade Designs and Their Culinary Uses
You’ll choose blade geometry based on the task: a flat blade gives coarse grinding by maximizing surface shear. A serrated blade improves chopping by introducing localized cutting edges and turbulence. A multi-tier blade combines both actions for versatile processing across textures. Choose blade materials like stainless steel for durability and corrosion resistance.
Flat Blade: Coarse Grinding
What makes a flat blade ideal for coarse grinding is its simple geometry and dominant shearing action: the broad, nearly horizontal edges strike and pulverize ingredients against the jar base rather than relying on high-velocity vortexing. You’ll appreciate that this design delivers predictable particle sizes with minimal heating because impact and compression dominate over friction. Operating at moderate RPMs, the flat blade reduces fines and preserves texture in nuts, pulses, and coarse chutneys. For safety, always ensure the jar is secured and the motor is off before inserting or removing blades; sharp, blunt-profile edges still cut on contact. Clean blades with a brush, not your fingers. Match load size to motor capacity to avoid stalling and excessive vibration that can compromise seals. Properly match the blade type to the task and follow loading and timing recommendations to prevent overheating and ensure consistent results.
Serrated Blade: Better Chopping
Moving from the broad, low-shear action of flat blades, serrated blades bring a different mechanical strategy optimized for chopping: their jagged edges concentrate force into narrow contact points, initiating micro-tears and fractures in fibrous or layered materials. You’ll notice cleaner separation of strands in herbs, onions, and root vegetables with less smearing and reduced heat buildup. Blade teeth reduce slipping on wet surfaces, so feeds stay engaged rather than spinning free. For safety, always de-energize the unit before inspecting or removing the serrated blade; teeth are sharper and catch debris. Maintenance requires careful wiping and occasional sharpening with a fine file along each tip. Use measured, short pulses to control particle size and avoid over-processing. These benefits are especially valuable when using higher-power units like 750-watt motors in family-size kitchens, which deliver consistent performance across tougher ingredients.
| Feature | Effect |
|---|---|
| Teeth profile | Concentrated cutting |
| Pulse use | Controlled particle size |
| Safety note | De-energize before contact |
Multi-tier Blade: Versatile Processing
How does a multi-tier blade achieve both coarse and fine processing in a single pass? You rely on staggered cutting planes: upper tiers shear larger pieces while lower tiers provide finer shearing and abrasion. The design spaces blades at calculated axial distances and varying tooth geometries to control shear rate, residence time, and particle fracture patterns. You’ll notice reduced recirculation, so material moves downward through successive cutting stages, minimizing overprocessing. From a safety perspective, the system reduces required passes and heat build-up, lowering burn risks; still, you should ensure proper locking, use gloves when cleaning, and disconnect power before touching blades. For consistent results, match rotational speed and feed volume to blade pitch and material hardness, preventing clogging and mechanical stress. Kenstar mixer grinders often include multiple jars and durable stainless steel blades that support versatile processing across tasks.
Electrical and Mechanical Safety Features to Look For
Why should you care about safety features? You’ll reduce risk of electrical faults, mechanical failure, and user injury by prioritizing specific protections. Look for thermal overload cutouts that sense motor temperature and interrupt supply before insulation degrades; they should reset automatically or via accessible manual switch. Ensure earth leakage protection or double insulation ratings to prevent shock from fault currents. Check for robust interlock mechanisms: lid and jar sensors must prevent motor start unless correctly seated. Examine shaft and coupling design for shear pins or torque-limited couplings that fail predictably under jam loads, protecting motor and blades. Prefer housings with adequate creepage/clearance distances and flame-retardant materials rated to relevant standards (IEC/IS). Inspect ventilation paths and dust seals to avoid particulate ingress that causes short circuits. Confirm certifications and clear labeling for voltage, current, and duty cycle. These measurable, testable features will materially lower operational hazards without altering performance. Also perform routine inspections of jars, lids, blades, cords, and plugs to catch wear or damage early pre-use checks.
Step-by-Step: Operating a Mixer Grinder Safely
Before you start, verify the power source and cable integrity, ensuring the plug and socket match the appliance rating and there’s no fraying. Fit the correct jar and secure the lid to match the task and blade assembly to prevent imbalance or ejection. After use, follow a cleaning protocol and store components dry and locked to the base to avoid contamination and mechanical damage. Allow rest intervals between cycles to prevent overheating and prolong motor life by avoiding continuous long runs proper ventilation.
Check Power and Connections
Want to guarantee safe startup? Inspect the power source and connections before you plug in. Verify the outlet voltage matches the grinder’s rating on the nameplate; using mismatched voltage stresses components and can cause overheating. Check the power cord for cuts, exposed wires, frays, or brittle insulation; replace any damaged cable. Ensure the plug pins are straight and contacts aren’t corroded. Use a socket with a working earth/ground connection; don’t rely on ungrounded adapters. If your unit has a fuse or circuit breaker, confirm it’s functional and rated correctly. Avoid extension cords unless they’re heavy-duty and rated above the grinder’s current draw. Finally, make the initial power-up brief while monitoring for abnormal heat, noise, or smells. Consider also choosing units with overload protection to enhance safety during heavy use.
Use Correct Jar and Lid
How will using the correct jar and lid affect performance and safety? You must select jars rated for the grinder’s speed and torque; mismatched jars can flex, wobble, or fail under centrifugal forces. Use manufacturer-specified materials—stainless steel for dry grinding, heat-resistant polycarbonate for wet/blend tasks—to maintain structural integrity and avoid chemical leaching. Ensure lids have intact seals and locking mechanisms; a compromised seal permits pressure escape or ingredient ejection, creating burn or laceration hazards. Fit jars firmly to the coupling and confirm the interlock engages before starting. Never operate with a cracked jar or a loose lid. Inspect threads, gaskets, and locking tabs regularly and replace worn components with OEM parts to preserve alignment, balance, and safe containment during operation. Choosing jars and lids from reputable brands that include overload protection can further reduce the risk of motor damage and unsafe operation.
Clean and Store Safely
Why should you clean and store your mixer grinder methodically? You reduce corrosion, microbial growth, and electrical hazards. After each use, unplug unit and disassemble jars, blades, and lids. Rinse immediately to remove residues; use a soft brush for blade crevices and food traps. Avoid immersing the motor housing — wipe it with a damp cloth and mild detergent, then dry thoroughly. Inspect seals and vents for blockages; replace damaged gaskets to maintain airtight performance. Reassemble only when all components are fully dry to prevent moisture-induced short circuits. Store jars inverted on a ventilated rack; keep the motor in a dry, dust-free cabinet away from heat sources. Label cleaning dates and perform monthly preventive checks for wear and loose fasteners.
Cleaning and Routine Maintenance Tips
When should you clean each part of your mixer grinder to keep performance consistent and safe? Clean jars and blades after every use to prevent residue build-up and microbial growth. Wipe the motor housing weekly with a damp cloth; never immerse it. Inspect seals and gaskets monthly for wear and replace if compromised. Lubricate couplings sparingly following manufacturer guidance. Unplug before any maintenance.
| Component | Frequency | Action |
|---|---|---|
| Jars & Blades | After each use | Disassemble, wash, dry; inspect edges |
| Motor Housing | Weekly | Wipe; check vents for dust |
| Seals/Gaskets | Monthly | Inspect; replace if cracked |
| Coupling & Bearings | 3–6 months | Light lubrication; check alignment |
Record maintenance dates and parts replaced. Use only manufacturer-approved spare parts and tools. Keep the appliance on a stable, ventilated surface during operation. If you detect unusual noise or heat, stop using the unit and arrange professional inspection to preserve safety and performance.
Common Problems and Quick Troubleshooting
Noticing a drop in performance or unusual sounds? First, disconnect power and inspect the jar, blades, and coupling for foreign objects or misalignment; debris can cause drag and vibration. If the motor stalls or trips the fuse, check for overheating—allow cool-down, verify ventilation slots aren’t blocked, and test on a shorter duty cycle. Persistent burning smell indicates motor windings stress; stop use and seek professional repair. If grinding is inconsistent, confirm blade sharpness and secure jar fit; worn blades or loose locking mechanisms reduce efficiency. For excessive noise, examine bearings and mounting screws—tighten loose hardware and replace worn bearings. Electrical issues like intermittent starts often stem from a faulty switch, capacitor, or loose internal wiring; only a qualified technician should open the housing. Always use manufacturer-specified jars and avoid overloading; unexpected load spikes are a common failure mode. Maintain safety: unplug before any inspection and wear cut-resistant gloves when handling blades.
Tips for Consistent Texture and Best Practices
After you’ve ruled out mechanical and electrical faults, focus on process control to get consistent texture. You’ll standardize feed size, batch volume, and grind intervals. Use pulse vs. continuous modes deliberately; pulses prevent overheating and categorical over-processing. Monitor temperature — stop and cool if metal parts or contents exceed safe tactile thresholds. Secure lids and locks; never bypass safety interlocks.
Maintain blade sharpness; dull blades shear poorly and raise temperature. Calibrate grind time for target particle size and record settings. Clean and inspect seals to avoid contamination or leak-driven inconsistencies. Use measured liquid addition to control slurry viscosity.
| Parameter | Control action |
|---|---|
| Feed size | Uniform pre-cut pieces |
| Batch volume | Don’t exceed rated capacity |
| Grind time | Use timers, record results |
| Cooling | Rest cycles between runs |
| Safety | Verify interlocks, PPE |
Follow manufacturer torque and duty-cycle limits to extend lifespan and prevent hazardous failure.
Frequently Asked Questions
Can a Mixer Grinder Grind Ice Into Snow-Like Texture?
Yes — you can, but you shouldn’t unless the grinder’s manufacturer explicitly permits ice crushing. You’ll need a heavy-duty, high-torque motor and sturdy stainless-steel blades; always secure lid, pulse carefully, and avoid overloading to prevent damage.
Can I Use a Mixer Grinder for Making Nut Butter?
Yes, you can use a mixer grinder for nut butter, but it’s limited: you’ll need short bursts, high-torque jars, scrape frequently, monitor temperature to avoid oil separation, and avoid prolonged runs to prevent motor overheating or blade damage.
Do Mixer Grinders Affect Food Temperature During Grinding?
Yes — they can raise temperature slightly due to motor heat and friction; you’ll monitor short runs, pulse, and pauses to limit warming, use cool jars, and avoid overheating sensitive ingredients for safety and quality.
Are There Food-Safe Lubricants for Jar Coupler Maintenance?
Yes — you can use food-grade, NSF H1-certified lubricants (silicone or mineral oil-based) for jar coupler maintenance; follow manufacturer specs, apply minimal amounts, avoid contamination of food-contact parts, and re-lubricate only as recommended.
Can a Mixer Grinder Be Converted to a Bench-Top Mill?
Not safely—you’re risking motor overheating, inadequate cutters, vibration, and no proper guarding. Converting needs mechanical redesign, speed reduction, robust bearings, fixed mounting, dust control and electrical protection; otherwise you’ll create a serious injury and fire hazard.