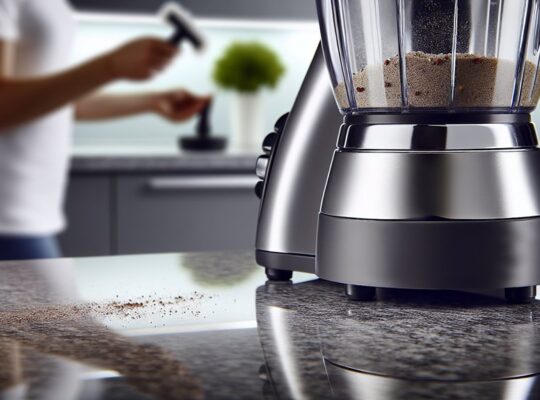
You’ll want to clean your mixer grinder jars naturally to avoid harsh chemicals and keep flavors pure, and it’s easier than you think. Start with a quick rinse after use and use common ingredients like vinegar and baking soda for deeper cleaning; they’re proven to cut grease and neutralize odors. Follow a few simple steps for stains, blades, and seals to restore your jars — here’s how to do it effectively and safely.
Key Takeaways
- Rinse jars, lids, and blades immediately after use to remove food residue and prevent stains or odors.
- Use a baking soda paste (baking soda + few drops water/soap) to scrub stubborn oil, spice, or masala stains gently.
- Clean mineral deposits and odors with diluted white vinegar (1 part vinegar to 3 parts water), contact 5–10 minutes, then rinse.
- Disassemble seals and gaskets, clean and dry them thoroughly; replace if cracked or persistently odorous to prevent mold.
- Air-dry jars inverted with lids off or loosely placed to ensure ventilation and prevent trapped moisture and mildew.
Why Clean Mixer Grinder Jars Naturally
Why bother cleaning your mixer grinder jars naturally? You’ll reduce chemical exposure, which matters because residues from harsh cleaners can contaminate food and irritate skin or lungs. Natural methods—like vinegar, baking soda, and lemon—have been studied for antimicrobial and deodorizing effects and are safe when used correctly. You’ll also protect jar materials and gaskets: acidic or abrasive commercial products can degrade seals and finishes, shortening appliance life and creating hygiene risks. Natural cleaning minimizes environmental impact by avoiding volatile organic compounds and persistent chemicals that enter waterways. For safety, you’ll follow measured concentrations and rinsing protocols to ensure no residual taste or acidity remains. Natural approaches are often cost-effective and accessible, letting you maintain sanitation standards without specialized equipment. In short, choosing natural cleaners gives you a predictable, evidence-based balance of efficacy, material preservation, user safety, and environmental responsibility. Regular maintenance like wiping seals and storing jars with the lid off helps prevent moisture buildup and prolongs gasket life preventative care.
Common Causes of Stains and Odors
When you don’t rinse jars thoroughly, food residue builds up along blades and seams and leaves stains that attract bacteria. If jars stay damp after use, trapped moisture promotes mold growth and persistent musty odors. Both residue and moisture create conditions that make staining and bad smells more likely unless you clean and dry jars promptly. Regularly inspect seals and gaskets to prevent leaks and ensure safe, odor-free storage, as worn parts can trap moisture and residue seals and gaskets.
Food Residue Buildup
How does food residue turn into stubborn stains and lingering smells in your mixer grinder jars? Leftover oils, pigments and tiny particles cling to metal and plastic surfaces after use. Oils oxidize and polymerize, forming thin films that trap colored compounds from turmeric, tomato and beet. Fine particulates settle into crevices around blades and seals, where mechanical agitation compacts them and reduces exposure to water and detergent. Enzymes from fruits and vegetables can break down, releasing odorous volatile compounds that bind to surfaces. Warm temperatures speed these reactions, so jars stored without prompt cleaning develop stronger stains and smells. To prevent this, remove residues promptly, rinse with hot water, and use safe, mildly alkaline cleaners that saponify oils and lift pigments before they set. Regular maintenance and proper ventilation of the motor and housing also help prevent odor transfer from the unit to the jars, especially in models with advanced ventilation.
Moisture and Mold
Ever noticed a musty smell or dark spots in your jars even after rinsing? Moisture trapped in seals, lids, and crevices creates conditions where mold and mildew grow quickly. Mold produces pigments and volatile compounds that cause stains and odors; these can persist despite surface rinsing. To prevent this, dry jars thoroughly after washing—air-dry inverted on a rack and wipe seals with a clean, dry cloth. Inspect rubber gaskets and lid threads regularly; replace any that show discoloration, cracking, or persistent odor. For existing mold, clean with a solution of vinegar (5–10% acetic acid) or diluted hydrogen peroxide, rinse well, and dry immediately. Always ventilate the area and wear gloves if you have sensitivity; don’t mix cleaning chemicals. Also consider checking jar materials and seals for overload protection and replace parts that compromise dry storage.
Everyday Ingredients You’ll Need
You’ll mostly need common pantry staples—baking soda, white vinegar, lemon, and salt—which are effective against stains and odors thanks to their mild abrasiveness, acidity, and deodorizing properties. You can also use warm water and a gentle dish soap to loosen residue before treating the jar. Optional tools like a soft brush, sponge, and bottle brush speed cleaning and protect stainless surfaces. Many users also prefer appliances with thicker stainless jars because they transfer less vibration and are easier to maintain.
Common Pantry Staples
Which everyday items in your kitchen will get the job done? You’ll rely on baking soda, white vinegar, coarse salt, and liquid dish soap — all proven, safe cleaners. Baking soda’s mild abrasiveness lifts residue without scratching stainless steel; mix with water to form a paste for stubborn spots. White vinegar’s acetic acid breaks down mineral deposits and neutralizes odors; dilute with water before use. Coarse salt adds mechanical scrubbing power for stuck particles when combined with lemon or oil. Liquid dish soap emulsifies oils and removes food films; use a gentle, fragrance-free formula to reduce irritation. Use measured amounts, rinse thoroughly, and dry jars completely to prevent corrosion and microbial growth. These staples are effective, economical, and low-risk when used correctly. Many Maharaja Whiteline models also include durable stainless steel jars that respond well to these natural cleaning methods and require gentle care.
Optional Cleaning Tools
What else do you need besides the pantry staples? You’ll want a few optional tools that make cleaning safer and more effective, especially around blades and seals. Use sturdy brushes, a silicone spatula, a soft cloth, and protective gloves. Follow safe handling: unplug the grinder, remove blades, and scrub gently to avoid cuts.
| Tool | Purpose | Safety tip |
|---|---|---|
| Bottle brush | Reaches narrow corners | Hold jar firmly |
| Small nylon brush | Cleans around blades | Brush away from your hand |
| Microfiber cloth | Polishes and dries | Avoid abrasive scrubbing |
| Silicone spatula | Removes paste | Flexible, non-scratching |
| Rubber gloves | Hand protection | Use correct size, inspect for tears |
These items minimize damage and contamination; they support evidence-based cleaning without harsh chemicals. Take care to keep vents clear and allow the unit to cool between uses to prevent overheating risks and protect motor life.
Quick Rinse and Dry Routine
Want a reliable habit that prevents stains and odors? Rinse jars immediately after use with warm running water to remove loose food particles. Within a minute, give each jar a quick scrub with a soft brush or non-abrasive sponge; evidence shows prompt rinsing reduces residue that leads to odor and bacterial growth. For blades and lids, tilt jars so water clears crevices; avoid immersing electrical bases. Add a small splash of mild liquid soap if contents were oily, rinse thoroughly to prevent soap residues that can trap odors. Shake out excess water and wipe rims and threads with a clean cloth—these spots trap moisture and encourage mildew. Air-dry jars upside down on a clean rack or drying mat; airflow significantly lowers microbial survival compared with closed storage. If you can’t dry immediately, leave lids off until completely dry. Store jars assembled only when both jar and lid are fully dry to maintain safety and prevent stale smells. Always unplug the mixer before removing jars or blades to ensure electrical safety.
Removing Stubborn Masala and Oil Stains
Spices and cooking oils leave tightly bound pigments and grease that ordinary rinsing won’t remove, so you’ll need targeted treatments to break them down without damaging plastic or steel jars. Dampen stubborn areas, sprinkle baking soda, and add a few drops of mild dish soap; scrub gently with a soft brush. For persistent stains, make a 1:1 paste of baking soda and white vinegar, apply for 10–15 minutes, then rinse thoroughly. Stainless steel tolerates warm vinegar; plastic needs shorter exposure and immediate rinsing. Always test a small area first.
Wattage around 450 watts is sufficient for many household tasks, so choose a model with appropriate wattage for your usage.
| Material | Cleaner | Contact time |
|---|---|---|
| Stainless steel | Baking soda + vinegar | 10–15 min |
| Hard plastic | Baking soda + soap | 5–10 min |
| Seams/gaskets | Soft brush + soap | Immediate, spot test |
Dry completely to prevent microbial growth. Wear gloves if you have sensitive skin, ventilate the area, and avoid abrasive pads that can scratch and trap residues.
Eliminating Lingering Garlic and Onion Odors
How do you get rid of that stubborn garlic or onion smell clinging to your mixer grinder jars? Start by rinsing the jar and blades immediately after use with hot water to prevent odor molecules from settling. For persistent smells, make a paste of baking soda and a little water, coat interior surfaces, let sit 15–30 minutes, then scrub with a soft brush; baking soda neutralizes sulfur compounds without harsh chemicals. Alternatively, fill the jar halfway with warm water, add two tablespoons of white vinegar, run the grinder for 30 seconds, then let the solution sit 10 minutes before rinsing; vinegar oxidizes odor-causing compounds. For safety, unplug the appliance before handling blades and wear gloves if you have skin sensitivity. If scent persists, place a teaspoon of activated charcoal or a few slices of lemon in the dry jar, seal for several hours, and air it out. Repeat treatments only as needed to avoid excessive wear. Always check that the jar is seated and the sealing ring is clean and properly positioned before running any cleaning cycles.
Cleaning Glass and Stainless Steel Jars Safely
After treating stubborn garlic and onion odors, you’ll want to clean glass and stainless steel jars in ways that protect their surfaces and your safety. Rinse jars immediately with warm water to remove loose food particles. For glass, use a soft sponge and a mild dish soap; avoid abrasive pads that can create micro-scratches where bacteria hide. For stainless steel, wash with warm water and an alkaline-safe soap, rinsing promptly to prevent salt or detergent residues. If you need extra grease removal, apply a paste of baking soda and water, rub gently with a soft cloth, then rinse thoroughly. Always dry both materials with a clean microfiber or lint-free towel to prevent water spots and microbial growth. Remove and clean lids, seals, and gaskets separately; inspect seals for damage and reassemble only when fully dry. Use gloves if you have sensitive skin, and work in a well-ventilated area when using concentrated cleaning agents.
Dealing With Rust Marks and Stains
Noticing small rust marks on your mixer grinder jars doesn’t mean they’re ruined; with prompt, correct treatment you can remove surface rust and prevent recurrence. First, rinse and dry the jar. Apply a paste of baking soda and lemon juice to rust spots, let sit 10–15 minutes, then scrub gently with a soft brush. Rinse thoroughly and dry immediately to avoid new oxidation. For persistent marks, use a vinegar soak for 30 minutes, then scrub and neutralize with baking soda. Always test any treatment on a small area first.
| Action | Purpose |
|---|---|
| Rinse & dry | Remove loose debris |
| Baking soda + lemon | Mild abrasive, acidic lift |
| Vinegar soak | Dissolves iron oxide |
| Soft brush | Avoids scratching |
| Immediate drying | Prevents re-rusting |
Wear gloves, work in a ventilated area, and avoid abrasive steel wool on stainless interiors. If rust penetrates deeply or compromises safety, replace the jar.
Deep-Cleaning Blades and Seals
Before you start, make sure the appliance is unplugged and remove the jar from the base so you can safely take out the blade assembly. Clean the blades with a cotton swab and mild detergent, paying attention to crevices, then soak and gently scrub the rubber or silicone seals to remove trapped food particles. Rinse everything thoroughly, dry completely with a lint-free cloth or air-dry, and reassemble only when all parts are fully dry to prevent corrosion and mold.
Remove Blades Safely
To remove blades safely, make sure the jar is unplugged and empty, then hold the jar firmly and twist the base or blade assembly according to your model’s instructions to disengage it; this prevents sudden loosening and protects the seals from damage. Wear cut-resistant gloves and use a non-slip mat to stabilize the jar. Inspect the blade hub for screws, clips or a locking ring; use the correct screwdriver or spanner—forceful prying can bend blades or strip threads. Lift blades straight out, keeping fingers away from sharp edges and placing them on a clean towel with blades facing up. If blades are stuck, apply a few drops of warm soapy water and wait five minutes before attempting again. Store removed blades safely until cleaning.
Clean Seals Thoroughly
How often you clean the rubber or silicone seals will directly affect odor, leakage and bacterial build-up, so give them the same attention you give the blades. Remove seals gently, inspect for cracks, and rinse under warm water to remove food particles. Use a soft brush with a mild, natural detergent or a 1:1 vinegar-water solution to scrub grooves; studies show vinegar reduces bacterial load without harsh chemicals. Avoid boiling seals unless manufacturer permits, as heat can deform them. After cleaning, rinse thoroughly to remove residues that can cause irritation or chemical taste.
- Inspect: look for cuts, hardening, or deformation; replace if compromised.
- Clean: brush with mild detergent or vinegar solution, then rinse.
- Sanitize: short soak in diluted vinegar if needed, then rinse.
Dry and Reassemble
Ready to reassemble? First ensure every component is completely dry; moisture trapped around blades or seals promotes corrosion and mold. Pat parts with a lint-free cloth, then air-dry on a clean rack for at least 30 minutes or until no surface dampness remains. Inspect silicone seals and blade housings for residual debris or hair; use a soft brush if needed and dry again. Refit seals evenly—don’t stretch or twist them—and confirm they sit flush in their grooves to maintain pressure and prevent leaks. When reinstalling blades, hold them by the hub, not edges, to avoid cuts; tighten according to manufacturer torque recommendations. Run a short water-only test cycle and check for leaks before normal use.
Preventive Care to Keep Jars Fresh
Why not make freshness a habit rather than a chore? You can prevent stains, odors, and bacterial growth by adopting small, evidence-based routines. Rinse jars immediately after use to remove residues; food left to dry increases microbial risk. Use mild detergent and a soft brush weekly for thorough cleaning; abrasive tools can damage seals and encourage leaks. Dry jars completely before storing to inhibit mold.
- Rinse and wipe: Rinse within minutes of use and wipe rims and lids to prevent buildup.
- Weekly deep-clean: Run warm soapy water with a brush, then sanitize with a diluted vinegar solution (1 part vinegar to 3 parts water) for 5 minutes. Rinse thoroughly.
- Store dry and ventilated: Store jars with lids off or loosely placed on a rack to allow airflow.
Follow these steps consistently; they reduce contamination risk and extend jar life while keeping your kitchen safe.
Frequently Asked Questions
Can I Run Jars in the Dishwasher Safely?
Yes, you can if the jars and blades are labeled dishwasher-safe; otherwise, don’t. Hot cycles and detergents can dull seals, corrode blades, or warp plastic. Hand-wash non-rated parts to preserve function and safety.
Can I Use Lemon Juice on Plastic Jars?
Yes — you can use lemon juice on many plastic jars, but it can stain or degrade softer plastics over time. Test a small area first, avoid prolonged soaking, and rinse thoroughly to maintain safety and odor control.
How Often Should Blades Be Lubricated?
You shouldn’t regularly lubricate mixer grinder blades; they’re sealed and maintenance-free. Only lubricate shaft bearings per manufacturer guidance—typically annually or when noisy—using food-safe lubricant, following exact model instructions to ensure safety and warranty compliance.
Can I Sanitize Jars With Vinegar for Baby Food?
Yes — you can sanitize jars with white vinegar; its acetic acid reduces many bacteria. Rinse thoroughly, air-dry, and for baby food consider following vinegar with a water boil or steam sterilization to ensure safety.
Are There Natural Cleaners That Remove Mold?
Yes — you can use vinegar, hydrogen peroxide, or baking soda solutions to remove mold; they’re effective when applied correctly, left to dwell, scrubbed, and rinsed. Use gloves, ventilate, and test surfaces first.