If your mixer grinder is vibrating more than usual, it’s usually a mounting or drivetrain issue you can fix. Check that the jar sits straight and the blades, coupling, and rubber feet aren’t worn or loose. Uneven surfaces, debris, or a warped jar rim can also throw it off balance. You’ll want to inspect and tighten specific parts next to pinpoint whether it’s a simple reseat or a part that needs replacement.
Key Takeaways
- An off‑center or improperly seated jar causes imbalance and rapid rhythmic vibration when the grinder runs.
- Worn, loose, or damaged blades or blade assembly create uneven forces and noisy, clattering vibration.
- A cracked or deteriorated motor-to-blade coupling (or missing rubber insert) produces lateral wobble and vibration.
- Worn motor bearings, rotor/stator misalignment, or internal damage cause grinding noise, heat, and sustained vibration.
- Loose base screws, damaged feet, or an uneven support surface amplify vibration and allow the unit to creep or hop.
Common Signs Your Mixer Grinder Is Vibrating Excessively
Noticing unusual shaking? You’ll feel rapid, rhythmic vibrations through the base and countertop when the grinder runs; that’s a primary sign. Listen for abnormal noise—steady buzzing, rattling, or metallic clanks that change with speed indicate excessive vibration. Watch for lateral movement: the unit should stay stationary; if it creeps, hops, or skates, stop use immediately. Check for unusual heat buildup at the motor housing or base; excess vibration often raises temperature and risks damage. Inspect seals and feet: cracked or compressed rubber feet reduce damping and amplify vibration. Observe jar stability without opening the lid—if the jar rocks, vibrates excessively, or produces grinding impacts against the housing, that’s symptomatic. Note changes in performance: coarser grind, uneven throughput, or motor stalling under normal load correlate with vibratory issues. If any of these signs appear, disconnect power and address the cause before continued operation to reduce safety and equipment hazards. Also inspect blade condition and balance—dull or imbalanced blades increase motor torque and vibration, so replace or rebalance them promptly.
Unbalanced or Improperly Seated Jar
Why is the jar wobbling? If the jar isn’t centered or its base isn’t seated squarely on the motor coupling, you’ll feel pronounced vibration and lateral movement. First, unplug the unit and lift the jar straight up to inspect the coupling and jar base for debris, food buildup, or a warped rim that prevents full contact. Check that the jar is the correct model for the grinder; mismatched jars can sit off-center. When you reseat, align any bayonet slots or guide tabs and press down evenly until you hear or feel the locking click. Avoid running the grinder with a half-seated jar — that increases vibration and risks the jar slipping off during operation. Also distribute contents evenly; a heavy lump to one side amplifies imbalance. After seating, run briefly at low speed while holding the jar housing at a safe distance to confirm stability before proceeding to full speed. For commercial or heavy-duty use, regularly inspect and maintain the sealed bearings to prevent excess vibration and extend motor life.
Worn or Loose Blades and Blade Assembly
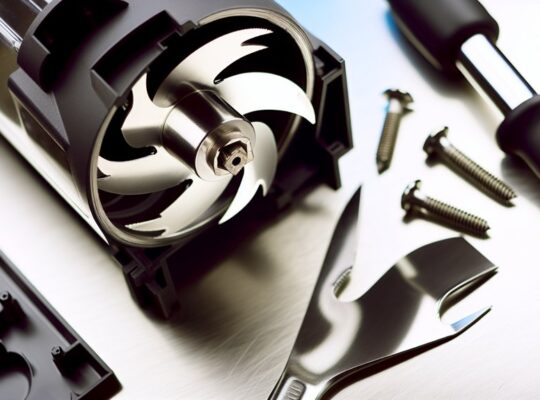
How worn or loose are the blades and blade assembly? Inspect the cutting edges for nicks, rounded tips, or uneven wear; even small differences change mass distribution and create high-frequency vibration. With the unit unplugged and jar removed, check blade retention: if the nut, screw, or bayonet fastener shows play, torque it to the manufacturer’s spec or replace the fastener. Look for cracked or deformed blade arms and for corrosion that thins metal—replace blades showing permanent damage. Verify the blade carrier sits flush in the jar base and that any sealing gasket isn’t extruded or missing, which lets the assembly shift under load. When reinstalling, hand-tighten then apply the specified final torque; using pliers incorrectly can warp components. After reassembly, run a short, no-load test at low speed while standing clear; listen for new rubbing, scraping or repetitive thumps. If vibration persists despite correct blade condition and fastening, proceed to inspect adjacent drive components. Also check the motor coupling and base mounting for motor and speed issues that can transfer or amplify vibration.
Damaged or Misaligned Coupling
If you’ve checked the blades and their fitting but the grinder still vibrates, inspect the coupling that links the motor shaft to the blade assembly. The coupling transfers torque; if it’s cracked, split, deformed, or has missing rubber inserts, you’ll get eccentric rotation and vibration. With the appliance unplugged and the jar removed, visually examine the coupling for signs of wear, cracking, or uneven gap between motor shaft and blade hub. Rotate the shaft manually—any wobble or lateral play indicates misalignment or a fatigued coupling.
Measure runout with a dial indicator or use a straightedge; even small offsets amplify at high RPMs. Replace worn elastomeric or plastic couplings with manufacturer-specified parts—do not jury-rig with adhesives or generic sleeves. When fitting a new coupling, ensure concentric seating and correct torque on retaining screws. After reassembly, run a short test at low speed to confirm vibration is eliminated before normal use. Always disconnect power and follow safety procedures. For ongoing leak prevention and safe operation, regularly inspect and maintain gaskets and seals to ensure proper jar sealing and avoid spills.
Worn Motor Bearings and Internal Components
Ever wondered whether the noise and shaking come from inside the motor itself? If bearings or internal parts are worn, you’ll feel vibration transmitted directly through the housing. You should power off and unplug before inspecting; internal work can be hazardous.
- Symptoms: grinding, whining, increased heat, and axial play on the rotor indicate bearing wear.
- Diagnosis: remove the housing (follow manufacturer instructions), spin the rotor by hand—roughness or wobble confirms internal wear. Check for scored shafts, debris, or lubricant breakdown.
- Repair options: replace bearings with specified part numbers and tolerances, re-lubricate if serviceable, and replace damaged rotor/stator components. Use correct tools and torque settings.
- Safety and testing: after reassembly, run the grinder unloaded, monitor vibration with your hand and short test runs; stop immediately if vibration persists or abnormal noise returns.
For heavy-duty use or frequent grinding of tough ingredients, consider a higher-wattage model like a 1000W unit for greater durability and continuous-use capability.
Loose Mounting Screws and External Fasteners
Start by checking the base and rubber feet for wear or uneven contact, since an unstable base amplifies vibration. Then inspect the mounting screws that secure the motor and jar assembly for looseness or missing threads. Finally, tighten all external fasteners to the specified torque and recheck runout to confirm vibration is reduced. Kenstar units often include multiple jars and durable components, so also ensure the three jars are seated correctly before testing.
Check Base and Feet
Wondering whether loose mounting screws or external fasteners are causing the vibration? Check the base and feet first — they’re the primary interface with your countertop and affect stability, resonance, and safety.
- Examine rubber feet for wear or compression; replace if cracked or flattened to restore damping.
- Verify base plate is flat and free of deformities; a warped base transmits motor oscillations directly to the surface.
- Confirm feet are evenly seated and the unit sits level; use a spirit level and adjust or add non-slip pads as needed.
- Tighten external foot-fasteners and ensure any captive screws are secure, but don’t overtighten plastic mounts.
Addressing these prevents movement, reduces noise, and lowers risk of tip-over. Processors and mixer grinders with proper overload protection and stable feet tend to vibrate less under load.
Inspect Mounting Screws
If you’ve checked the base and feet, the next place to look is the mounting screws and any external fasteners that secure the motor housing and plate—loose or missing screws let the motor shift and amplify vibration. You should unplug the unit, remove the cover per the manual, and visually inspect all fasteners for looseness, corrosion, or stripped heads. Note any missing screws and any gaps between mating surfaces. Don’t operate until you’ve documented issues.
| Fastener | Condition to check |
|---|---|
| Motor housing screws | Loose, missing, stripped |
| Mounting plate bolts | Corrosion, play |
| External cover screws | Cross-threading, fit |
| Vibration dampers | Compression, damage |
| Ground/earthing screw | Tightness, continuity |
If you’re unsure, consult a technician to avoid injury or damage. Sujata’s stainless steel components often give better durability compared with models that use more plastic parts.
Tighten External Fasteners
Why check and tighten external fasteners now? You’ll reduce vibration sources, prevent wear, and keep operation safe. Before you start, unplug the unit and wait for the motor to cool.
- Inspect: examine base screws, feet, and cover bolts for looseness or corrosion; note missing fasteners.
- Tighten: use correct screwdriver or socket, apply firm, even torque; avoid overtightening plastic threads.
- Replace: swap stripped or corroded screws with OEM-equivalent fasteners; use washers where specified to distribute load.
- Verify: run a short, low-speed test with the grinder on a stable surface; recheck torque after initial run.
If vibration persists after secure fasteners, proceed to internal balancing checks or professional service to avoid injury. Also consider checking for a properly functioning thermal overload cut-off as part of routine safety checks.
Surface and Placement Issues Causing Vibration
Check that the grinder sits on a flat, rigid surface because uneven support will let the housing rock and amplify motor vibrations. Also inspect the rubber feet — if any are loose, worn, or missing the unit can shift and resonate during operation. Fixing the base support and securing or replacing feet usually removes surface-related vibration. Inspect and tighten the unit’s mounting screws and rubber feet to prevent looseness that can amplify motor vibration.
Uneven Surface Support
When your mixer grinder sits on an uneven or soft surface, its motor and rotating assembly won’t stay aligned, so you’ll feel pronounced vibration and sometimes a hopping or walking motion; place it on a flat, rigid countertop or use anti-vibration pads to restore stable support. You’ll reduce vibration, stress on bearings, and risk of movement by checking support and load distribution. Inspect and correct these points:
- Verify countertop is level and solid; avoid laminate over hollow cabinets.
- Use anti-vibration pads rated for appliance weight to damp resonant frequencies.
- Position unit away from edge and on a continuous rigid plane to prevent tipping.
- Recheck after each heavy use; thermal expansion or spilled liquid can create soft spots.
Follow these steps to maintain safety and prolong motor life.
Loose Appliance Feet
Ever notice your mixer grinder creeping or rattling even on a flat counter? Loose or worn feet are a common cause: they reduce friction, create uneven contact, and let vibrations transfer into lateral movement. First unplug the unit and inspect each rubber or silicone foot for cracks, compression set, or missing screws. Tighten any retaining fasteners and replace damaged feet with manufacturer-specified parts to preserve clearance and electrical safety. If feet are adjustable, level the appliance using a small spirit level so the base is parallel to the countertop; check again under load. For temporary stabilization, use a non-slip mat rated for kitchen appliances, but don’t block ventilation. Regular checks every few months reduce drift, noise, and potential hazards.
When to Repair, Replace Parts, or Call a Technician
How do you decide whether to repair the grinder yourself, swap a part, or call a technician? You’ll balance risk, skill, cost, and safety. Inspect visually, unplug the unit, and note noises, heat, smell, and wobble before acting.
- If the issue is external (loose feet, misaligned jar, worn gasket) and you’re comfortable with basic tools, repair it yourself. Follow the manual and disconnect power.
- Replace discrete components (blades, rubber feet, jar seals) when parts are inexpensive and downloadable guides exist. Use OEM parts and torque specs where provided.
- Call a technician when you detect electrical faults (burning smell, sparking, tripped breakers), motor bearings failure, or if disassembly requires specialized tools. Don’t improvise repairs that expose live wiring.
- For intermittent faults or warranty-covered units, contact service to avoid voiding warranty or risking injury.
Frequently Asked Questions
Can Vibration Permanently Damage Motor Windings?
Yes — excessive vibration can permanently damage motor windings. You’ll get insulation degradation, loose coils, and eventual shorting or ground faults. Address imbalance, bearings, or mounting immediately to prevent irreversible motor failure and safety hazards.
Can Vibrations Affect Electrical Safety or Cause Sparks?
Yes — vibrations can compromise electrical safety and cause sparks if they loosen connections, wear insulation, or create metal-to-metal contact; you should disconnect power, inspect terminals, secure mounts, and replace damaged components promptly.
Do Different Jar Materials Vibrate Differently?
Yes — you’ll notice different jar materials vibrate differently: glass transmits clearer, higher-frequency vibrations; stainless steel dampens and spreads energy, reducing amplitude; plastic absorbs more, lowering vibration but can fatigue faster under heavy loads.
Will Vibration Increase Energy Consumption Noticeably?
Yes — it’ll slightly raise energy use if vibration causes inefficient coupling, bearing drag, or motor strain, but the increase is usually minor. Fix misalignment, loose mounts, or worn bearings to avoid higher consumption and safety risks.
Can Adding Weight to the Unit Reduce Vibration?
Yes — adding weight under or to the grinder can reduce vibration by lowering transmissibility and shifting resonance, but don’t obstruct ventilation or overload the base; secure mounts, anti‑vibration pads, or damping materials are safer.